Tag: Imposition

  • Lockup and Rising Spaces

    Lockup and Rising Spaces

    Lockup (from Alan Brignull)
    Lock­up (from Alan Brignull)

    Know­ing that all of your mat­ter to be print­ed has to be locked togeth­er in a met­al frame (the chase) leads to some impor­tant ques­tions, the pri­ma­ry one being: how can I make sure that every­thing will be lev­el and main­tain its struc­ture?  This prac­tice is called lock­up’.  Where lock­up is weak, it allows things to move with­in the forme and caus­es inac­cu­ra­cies.  In addi­tion, loose mate­r­i­al (like spaces) can work up from the forme to touch the print­ed page.  This leaves a black square mark between words where the spac­ing mate­r­i­al has been inked and print­ed.

    In longer-run jobs the impact of ris­ing spaces is mag­ni­fied: if a space is loose and can work up on each impres­sion, a move­ment of just 0.001″ per impres­sion will cause the space to print on the page after just 500 impres­sions.  In the world of com­mer­cial, high-vol­ume let­ter­press this could be a mas­sive prob­lem.

    The stan­dard warn­ings appear here about clean­li­ness and accu­ra­cy.  Make sure the bed of your press is clean, but also the back of the forme.  If need­ed turn the chase over and rest it on some paper on the stone.  Brush the back of the forme to make sure no debris will force a move­ment when it’s put in the bed of the press.

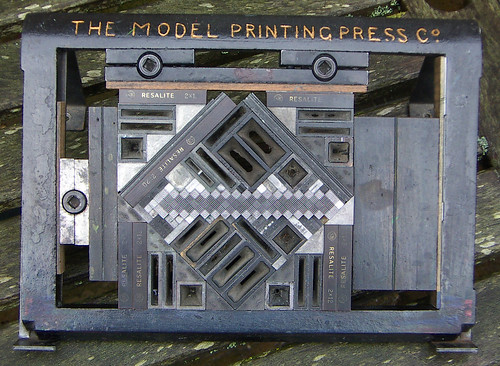
    Ensure your mate­ri­als are accu­rate: wood fur­ni­ture will absorb some of the inac­cu­ra­cies of your forme, but can also be affect­ed by mois­ture and warp­ing.  Even the ini­tial cut­ting of fur­ni­ture could be incor­rect.  Most print­ers moved from wood to met­al (alu­mini­um) or formi­ca (Resalite) fur­ni­ture from the 1950s.  Some wood­en fur­ni­ture is still need­ed to absorb some of the pres­sures in a chase.  Make sure you peri­od­i­cal­ly check that your chas­es are true by rest­ing them on your impos­ing sur­face and see­ing if the rock’.

    Tack­le lock­up in sec­tions: by mak­ing sure each line is prop­er­ly spaced; and then lock­ing up work sec­tion-by-sec­tion you will find and cor­rect errors much more quick­ly than by dis­cov­er­ing an error just before you go to press.

    Dur­ing print­ing any move­ment of the machine or vibra­tion will con­tribute to spaces ris­ing, so the whole machine should be clean.

    There is some spe­cif­ic advice for some types of mat­ter —

    • Mono­type Mat­ter
      Should have most pres­sure for lock up applied at the top and bot­tom of the forme because the spac­ing between words is sel­dom as good as hand com­po­si­tion.  When print­ing on a cylin­der press it should be set par­al­lel to the cylin­der because top-bot­tom move­ment would be min­i­mal
    • Linotype/Intertype/Lud­low Mat­ter
      Should be checked for accu­ra­cy of the slug, espe­cial­ly where the foot of the slug is small­er than the head.  In lock­ing up this would lead to a bulge as the feet of the slugs meet each oth­er and the head of the slug remains in place.  This can be avoid­ed by using thin paper or cop­per strips at the foot of the slug per­haps 0.002″ thick.  An alter­na­tive is to use wet blot­ting paper that will dry to cre­ate a sol­id block.  In print­ing on a cylin­der press this should be set at right angles to the cylin­der as left-right move­ment will be min­i­mal
    • Blocks
      These should be checked to ensure they are true.  Where they need some fur­ther lead­ing on one side, this should be tacked in to place

    Final­ly where a forme can­not be cor­rect­ed there is a very severe option: mix resin and meths.  Pour this on the forme and brush it away from the face of the type.  The whole forme will now be a sin­gle, sol­id mass.  At the end of print­ing, soak this in hot water to dis­solve the resin and diss the type.

  • Composition

    Composition

    It’s a won­der­ful feel­ing to have a met­al chase in front of you filled with type, know­ing that it’s only held in with the wood­en and met­al spac­ing and the expand­ing met­al quoins you’ve used. It’s a dif­fi­cult thing to mas­ter, but prac­tice is your friend.

    You need to start by assem­bling the type in a com­pos­ing stick, then trans­fer­ring this to a lev­el sur­face to lock up’. There are some addi­tion­al bits and pieces you’ll need

    This is an iter­a­tive process and you’ll have to go over set­ting type and lock­ing up mul­ti­ple times before you can be sure it’s safe to attach to the press. The steps are out­lined in this guide to lock­ing up

    Where the type meets the impres­sion of the press there’s the tricky busi­ness of mak­eready: get­ting all of your type, blocks of images and oth­er things to be print­ed to be per­fect­ly lev­el so that you can get the right impres­sion on the press. There’s a few point­ers in this tech­ni­cal notes on mak­eready

  • Locking Up

    Locking Up

    His­tor­i­cal­ly, the impos­ing stone was a slab of slate, ground flat, as was the type-bed of a wood­en hand-press. Lat­ter­ly the stone was gen­er­al­ly a pre­cise­ly machined iron cast­ing, sim­i­lar to an engi­neers’ sur­face-plate. A piece of plate glass, an off­cut from a gen­uine mar­ble or gran­ite kitchen work-sur­face or a tru­ly flat tile of sim­i­lar mate­r­i­al will prove ide­al.

    For small press­es such as Adanas, it should be at least twice the size of the chase and the big­ger the bet­ter. Type slid from the com­pos­ing stick should be assem­bled and sur­round­ed with strips of wood­en or plas­tic reglet or met­al gird­er fur­ni­ture as in one or oth­er of the above dia­grams. Note, in either chase, the gaps left which allow the type to be firm­ly locked in two planes. For a small clamshell plat­en the rec­tan­gle of type must always be cen­tred in the chase, oth­er­wise it will not print with an even impres­sion. If the type is to be print­ed to one side of a lar­gish sheet, most such small machines will allow the paper to over­hang on two or three sides.

    Quoins are essen­tial­ly expand­ing wedges; those illus­trat­ed are tight­ened with a square-end key and are the eas­i­est to use. They come in dif­fer­ent sizes and nar­row-mar­gin quoins take up less space in the assem­bled forme. If using an Adana with lock­ing-screws built into the chase, ensure that the screws bear on steel strips rather than on the soft­er, eas­i­ly dam­aged fur­ni­ture.

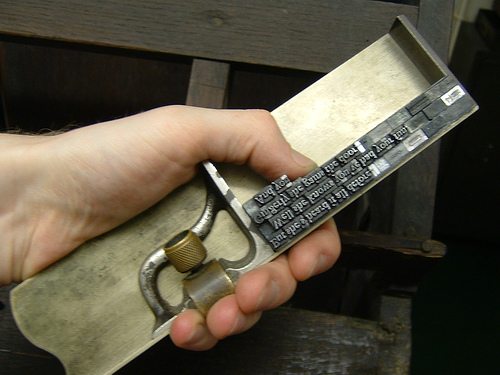
    Take care also to slide the assem­bled forme close enough to the edge of your stone to keep your screw­driv­er prop­er­ly aligned to avoid dam­ag­ing the threads in the chase. With the quoins tight­ened even­ly, lift one edge of the chase about a cen­time­tre clear of the stone (put a spare quoin or length of reglet under it) and test the forme for tight­ness by gen­tly pat­ting the type with your fin­gers. After rem­e­dy­ing any loose lines with hair-spaces, etc. try again. When sat­is­fied it is tight, loosen the quoins until the type is almost loose and plane the forme by plac­ing a plan­er, (a small, flat piece of MDF or birch ply­wood will do) on the type and press­ing down hard or gen­tly tap­ping it down with a leather mal­let. Tight­en the quoins even­ly and, after check­ing again for loose type, mount the forme on the press and you are almost ready to print.

    This guide kind­ly con­tributed by John R Smith of the Old Forge Press. Orig­i­nal­ly appeared in the newslet­ter of the Oxford Guild of Print­ers